• Home
  • Portfolio
  • Blog
  • About
  • Exhibitions
  • Imprint / Datenschutzerklärung
Menu

Hofschulz & Schoppa Photography

  • Home
  • Portfolio
  • Blog
  • About
  • Exhibitions
  • Imprint / Datenschutzerklärung
×
Featured
1 Month Switzerland
Jan 4, 2020
1 Month Switzerland
Jan 4, 2020
Read More →
Jan 4, 2020
Coast of Denmark
Nov 21, 2019
Coast of Denmark
Nov 21, 2019
Read More →
Nov 21, 2019
français memories
Oct 1, 2019
français memories
Oct 1, 2019
Read More →
Oct 1, 2019
Roadtrip Italy
Aug 30, 2019
Roadtrip Italy
Aug 30, 2019
Read More →
Aug 30, 2019
Palermo
Jul 31, 2019
Palermo
Jul 31, 2019
Read More →
Jul 31, 2019
Sicily
Jul 15, 2019
Sicily
Jul 15, 2019
Read More →
Jul 15, 2019
Our Offroad Car
May 22, 2019
Our Offroad Car
May 22, 2019
Read More →
May 22, 2019
Lisbon & Barber
May 15, 2019
Lisbon & Barber
May 15, 2019
Read More →
May 15, 2019
Our first Van
Apr 23, 2019
Our first Van
Apr 23, 2019
Read More →
Apr 23, 2019
Portugal back in January
Apr 4, 2019
Portugal back in January
Apr 4, 2019
Read More →
Apr 4, 2019
this week in Paris
Mar 31, 2019
this week in Paris
Mar 31, 2019
Read More →
Mar 31, 2019
Roadtrip Morocco - Part 2
Mar 24, 2019
Roadtrip Morocco - Part 2
Mar 24, 2019
Read More →
Mar 24, 2019
Synology NAS - the apps we use
Mar 21, 2019
Synology NAS - the apps we use
Mar 21, 2019
Read More →
Mar 21, 2019
Synology NAS - Note Station "The alternative to Evernote and OneNote"
Mar 14, 2019
Synology NAS - Note Station "The alternative to Evernote and OneNote"
Mar 14, 2019
Read More →
Mar 14, 2019
Chefchaouen
Mar 5, 2019
Chefchaouen
Mar 5, 2019
Read More →
Mar 5, 2019
 

Synology NAS - the apps we use

Marcus Felix Hofschulz March 21, 2019

We have been working with our Synology for a long time. Our NAS system is an important part of our workflow. In addition our PCs, smartphones and tablets are also connected to Synology. This gives us access to our data at any time, no matter where we are.

It is important that Synology allows permanent access. That' s why our Synology is located at our hoster and service provider Honds IT GmbH in Aachen. Through a fixed IP address and an SSL connection, we have the possibility to securely access our system.

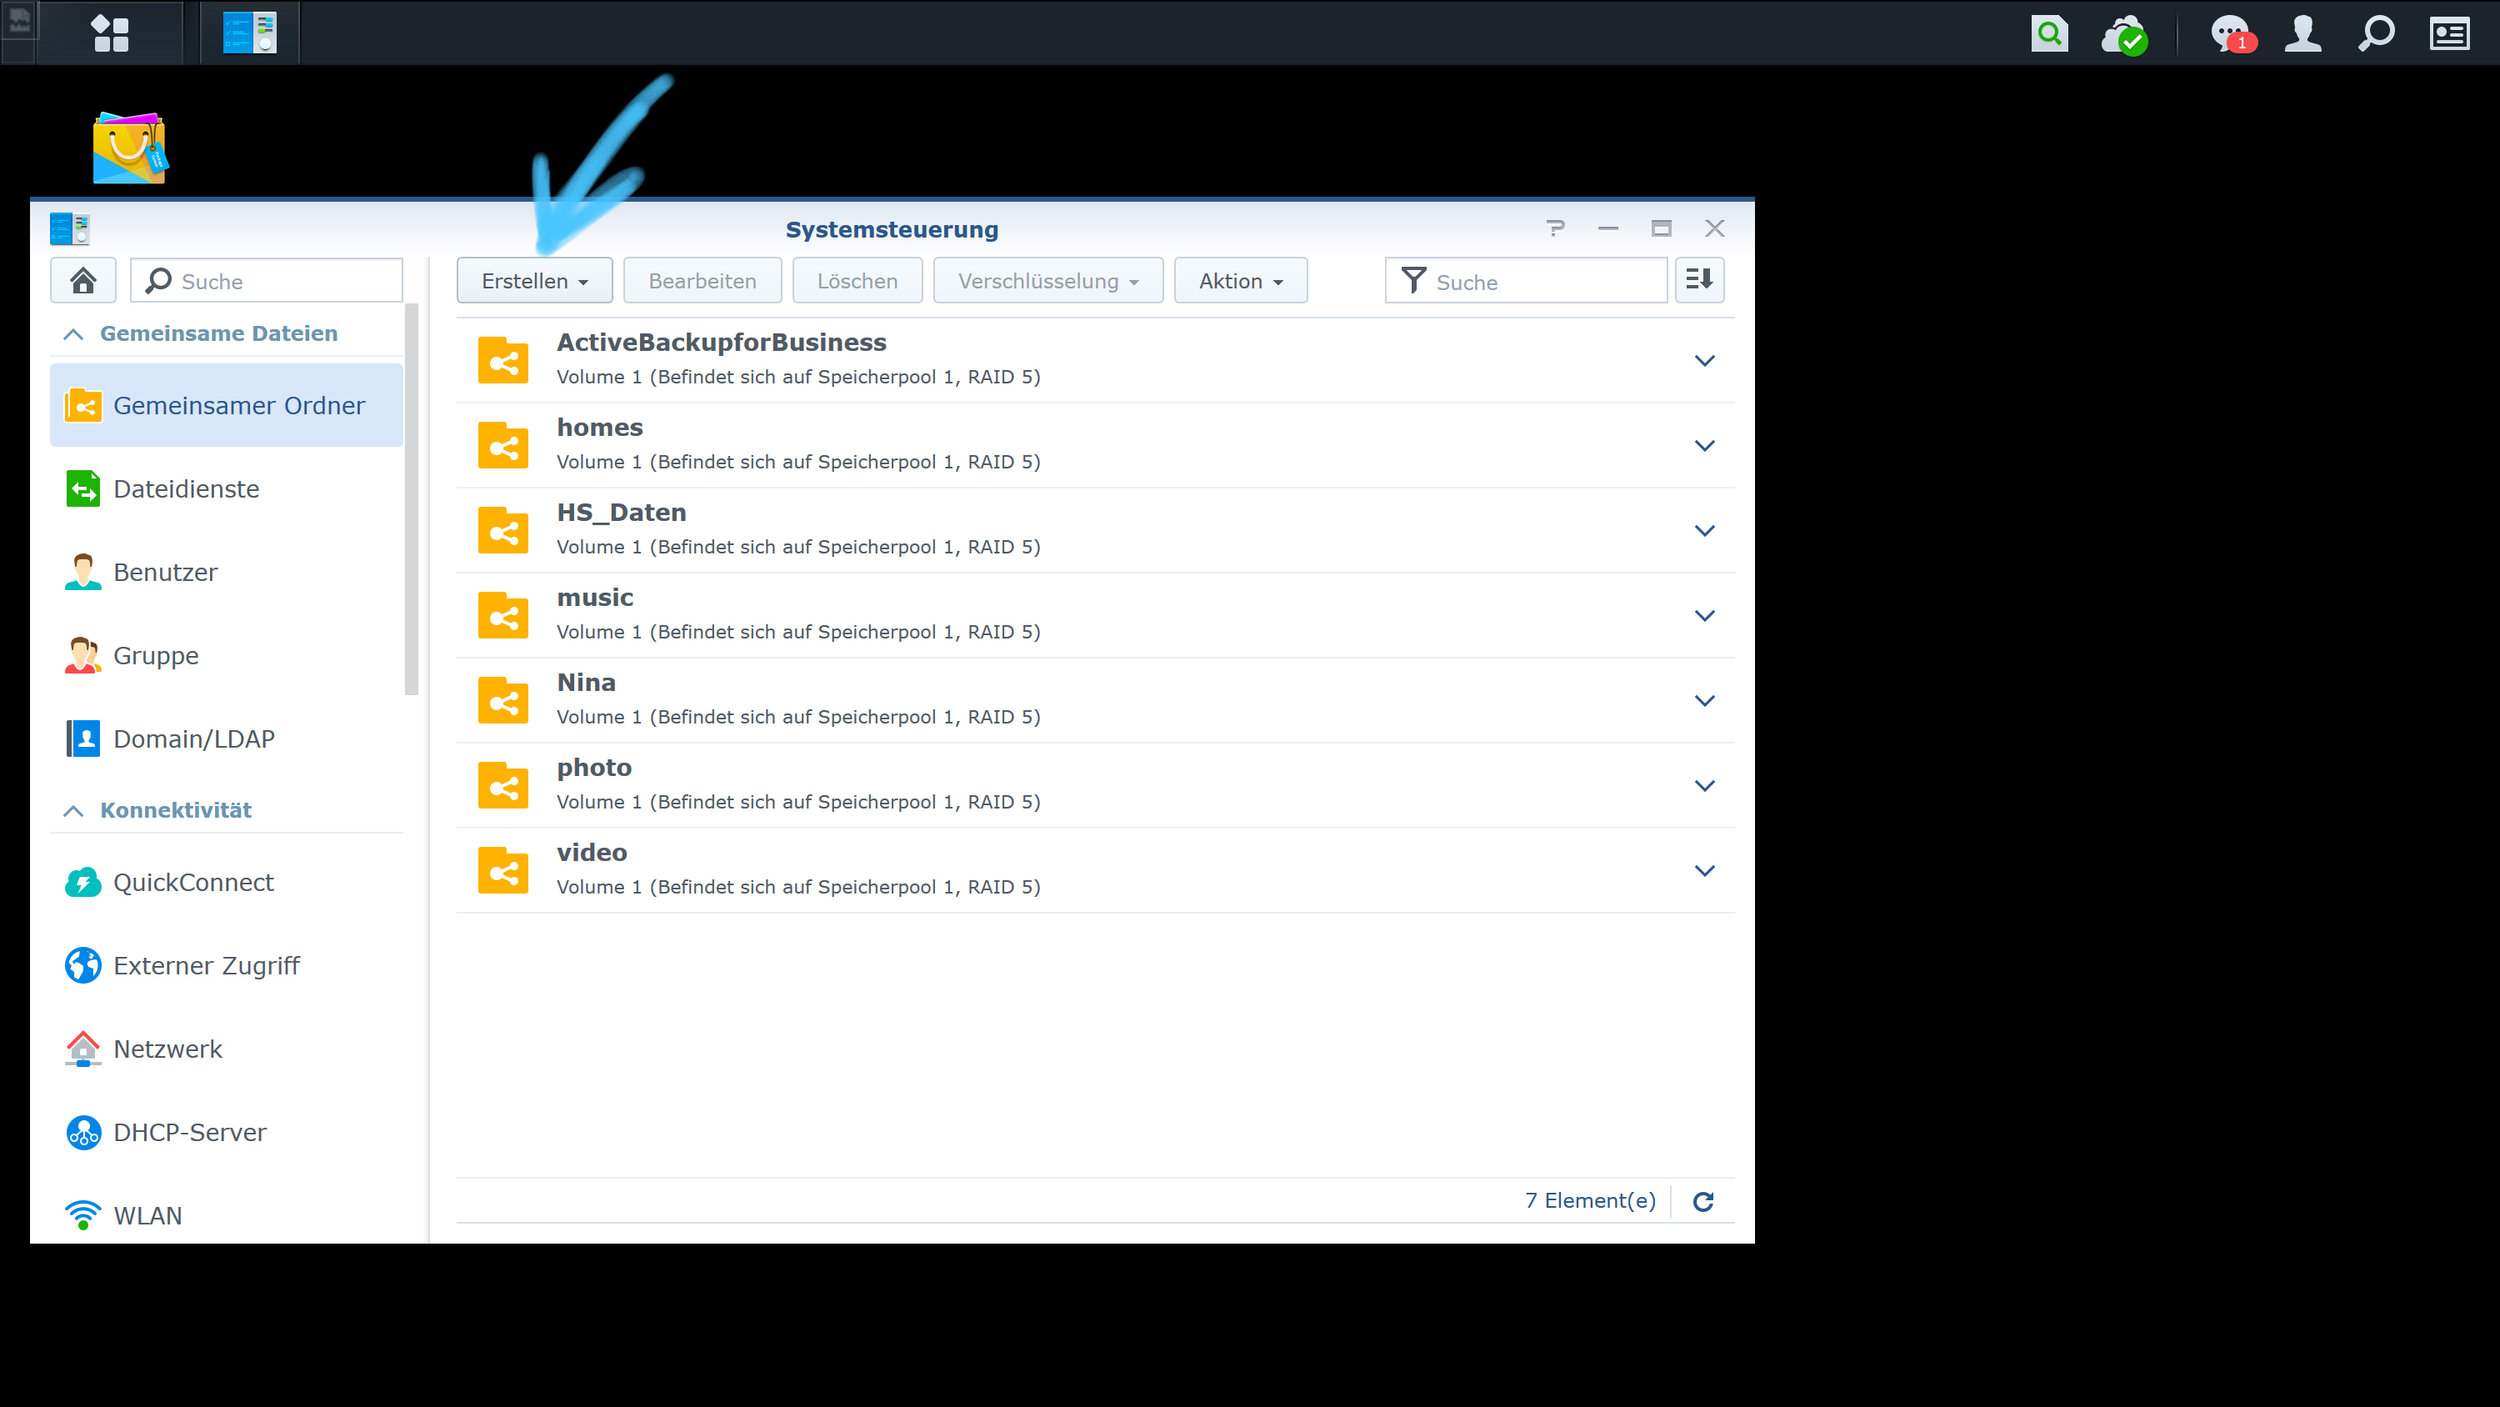
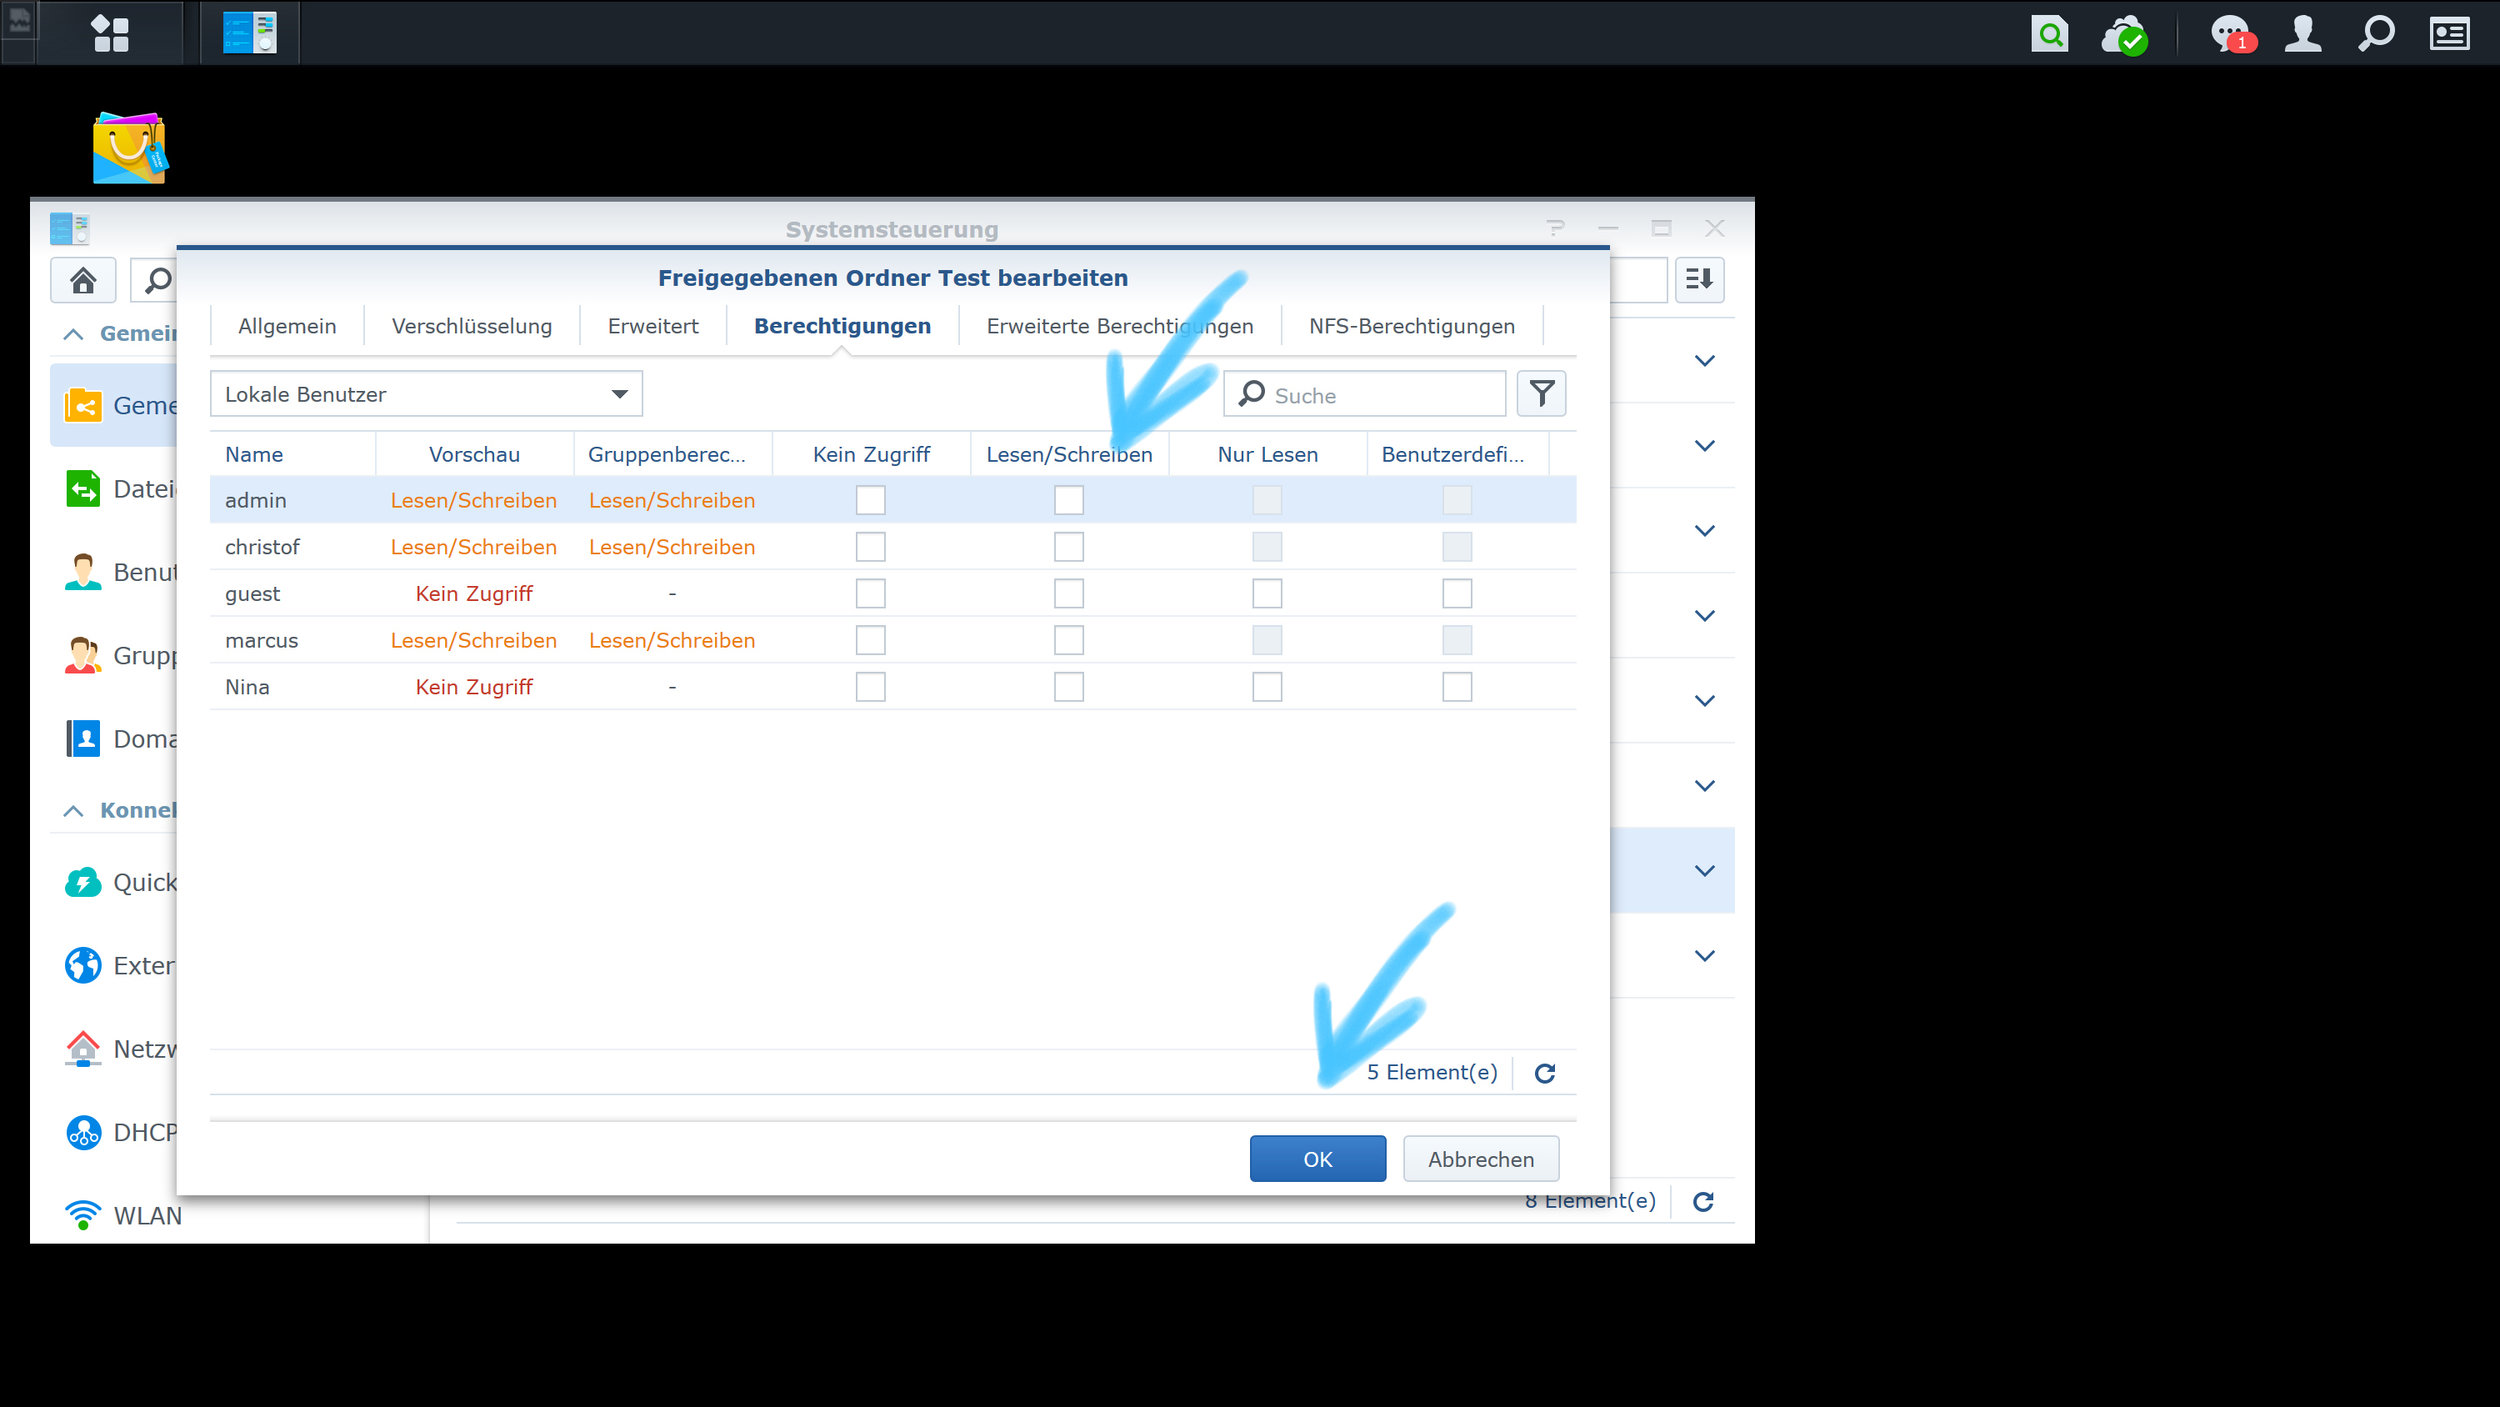
Synology offers the possibility to access our data directly through innovative app's via our mobile devices. This simplifies the workflow significantly.

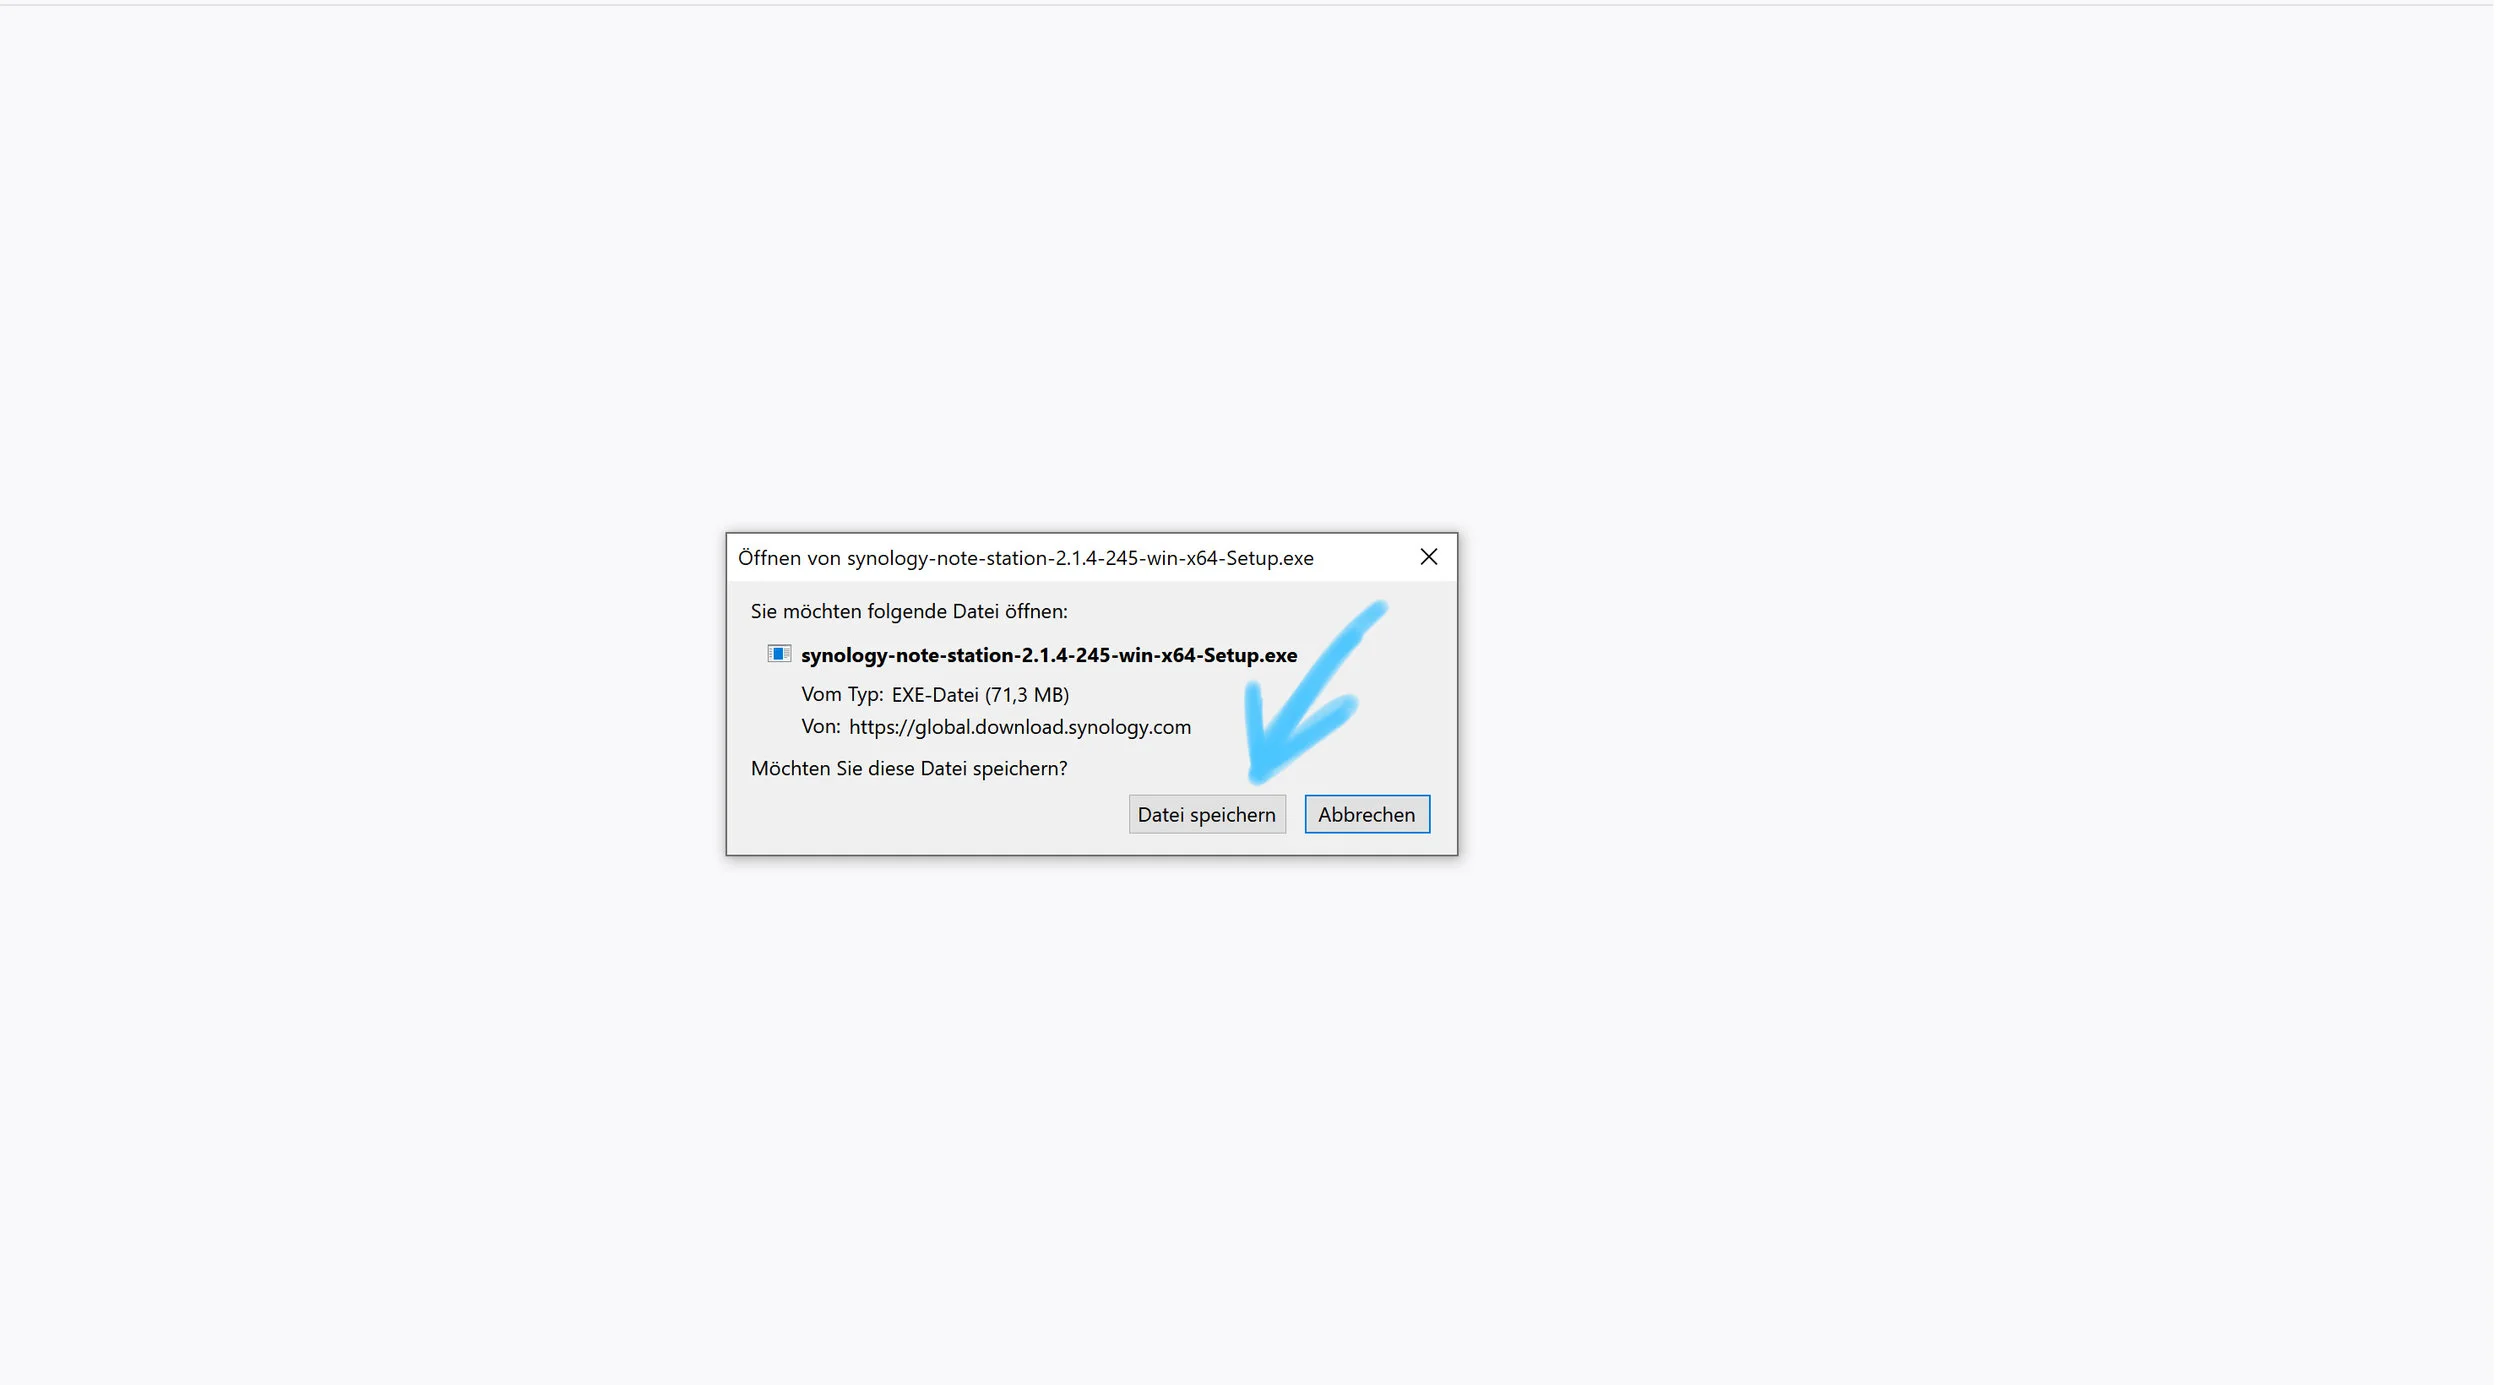
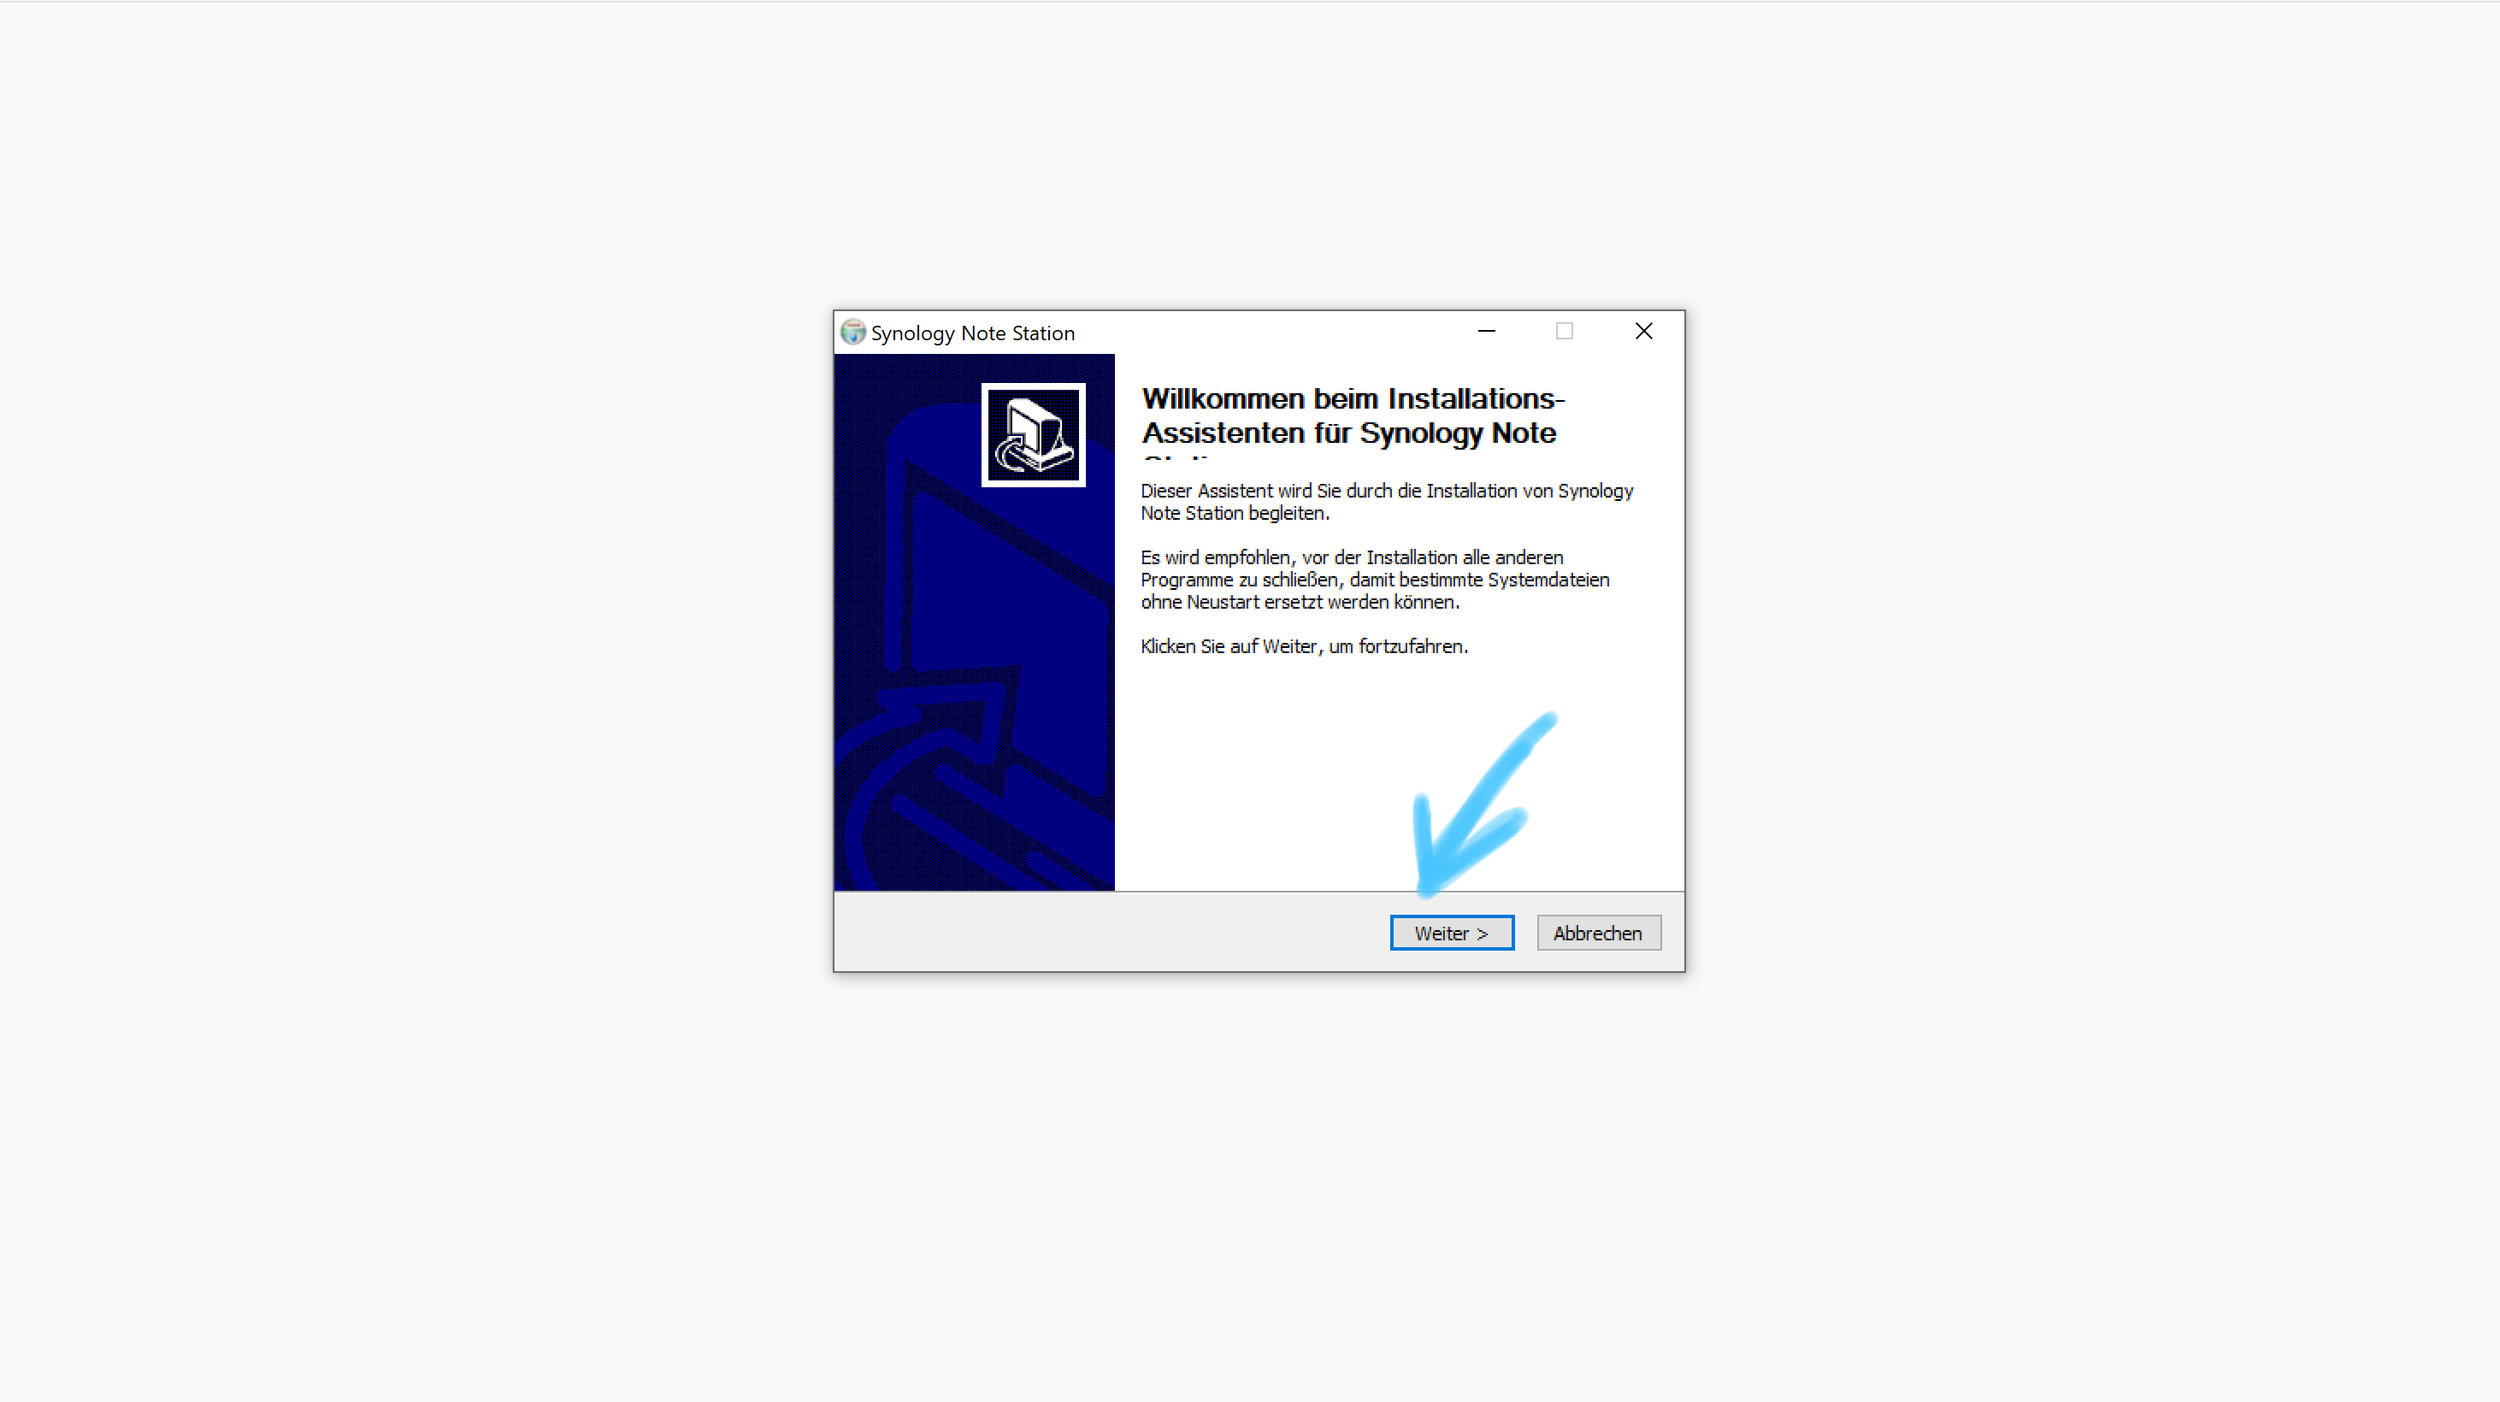
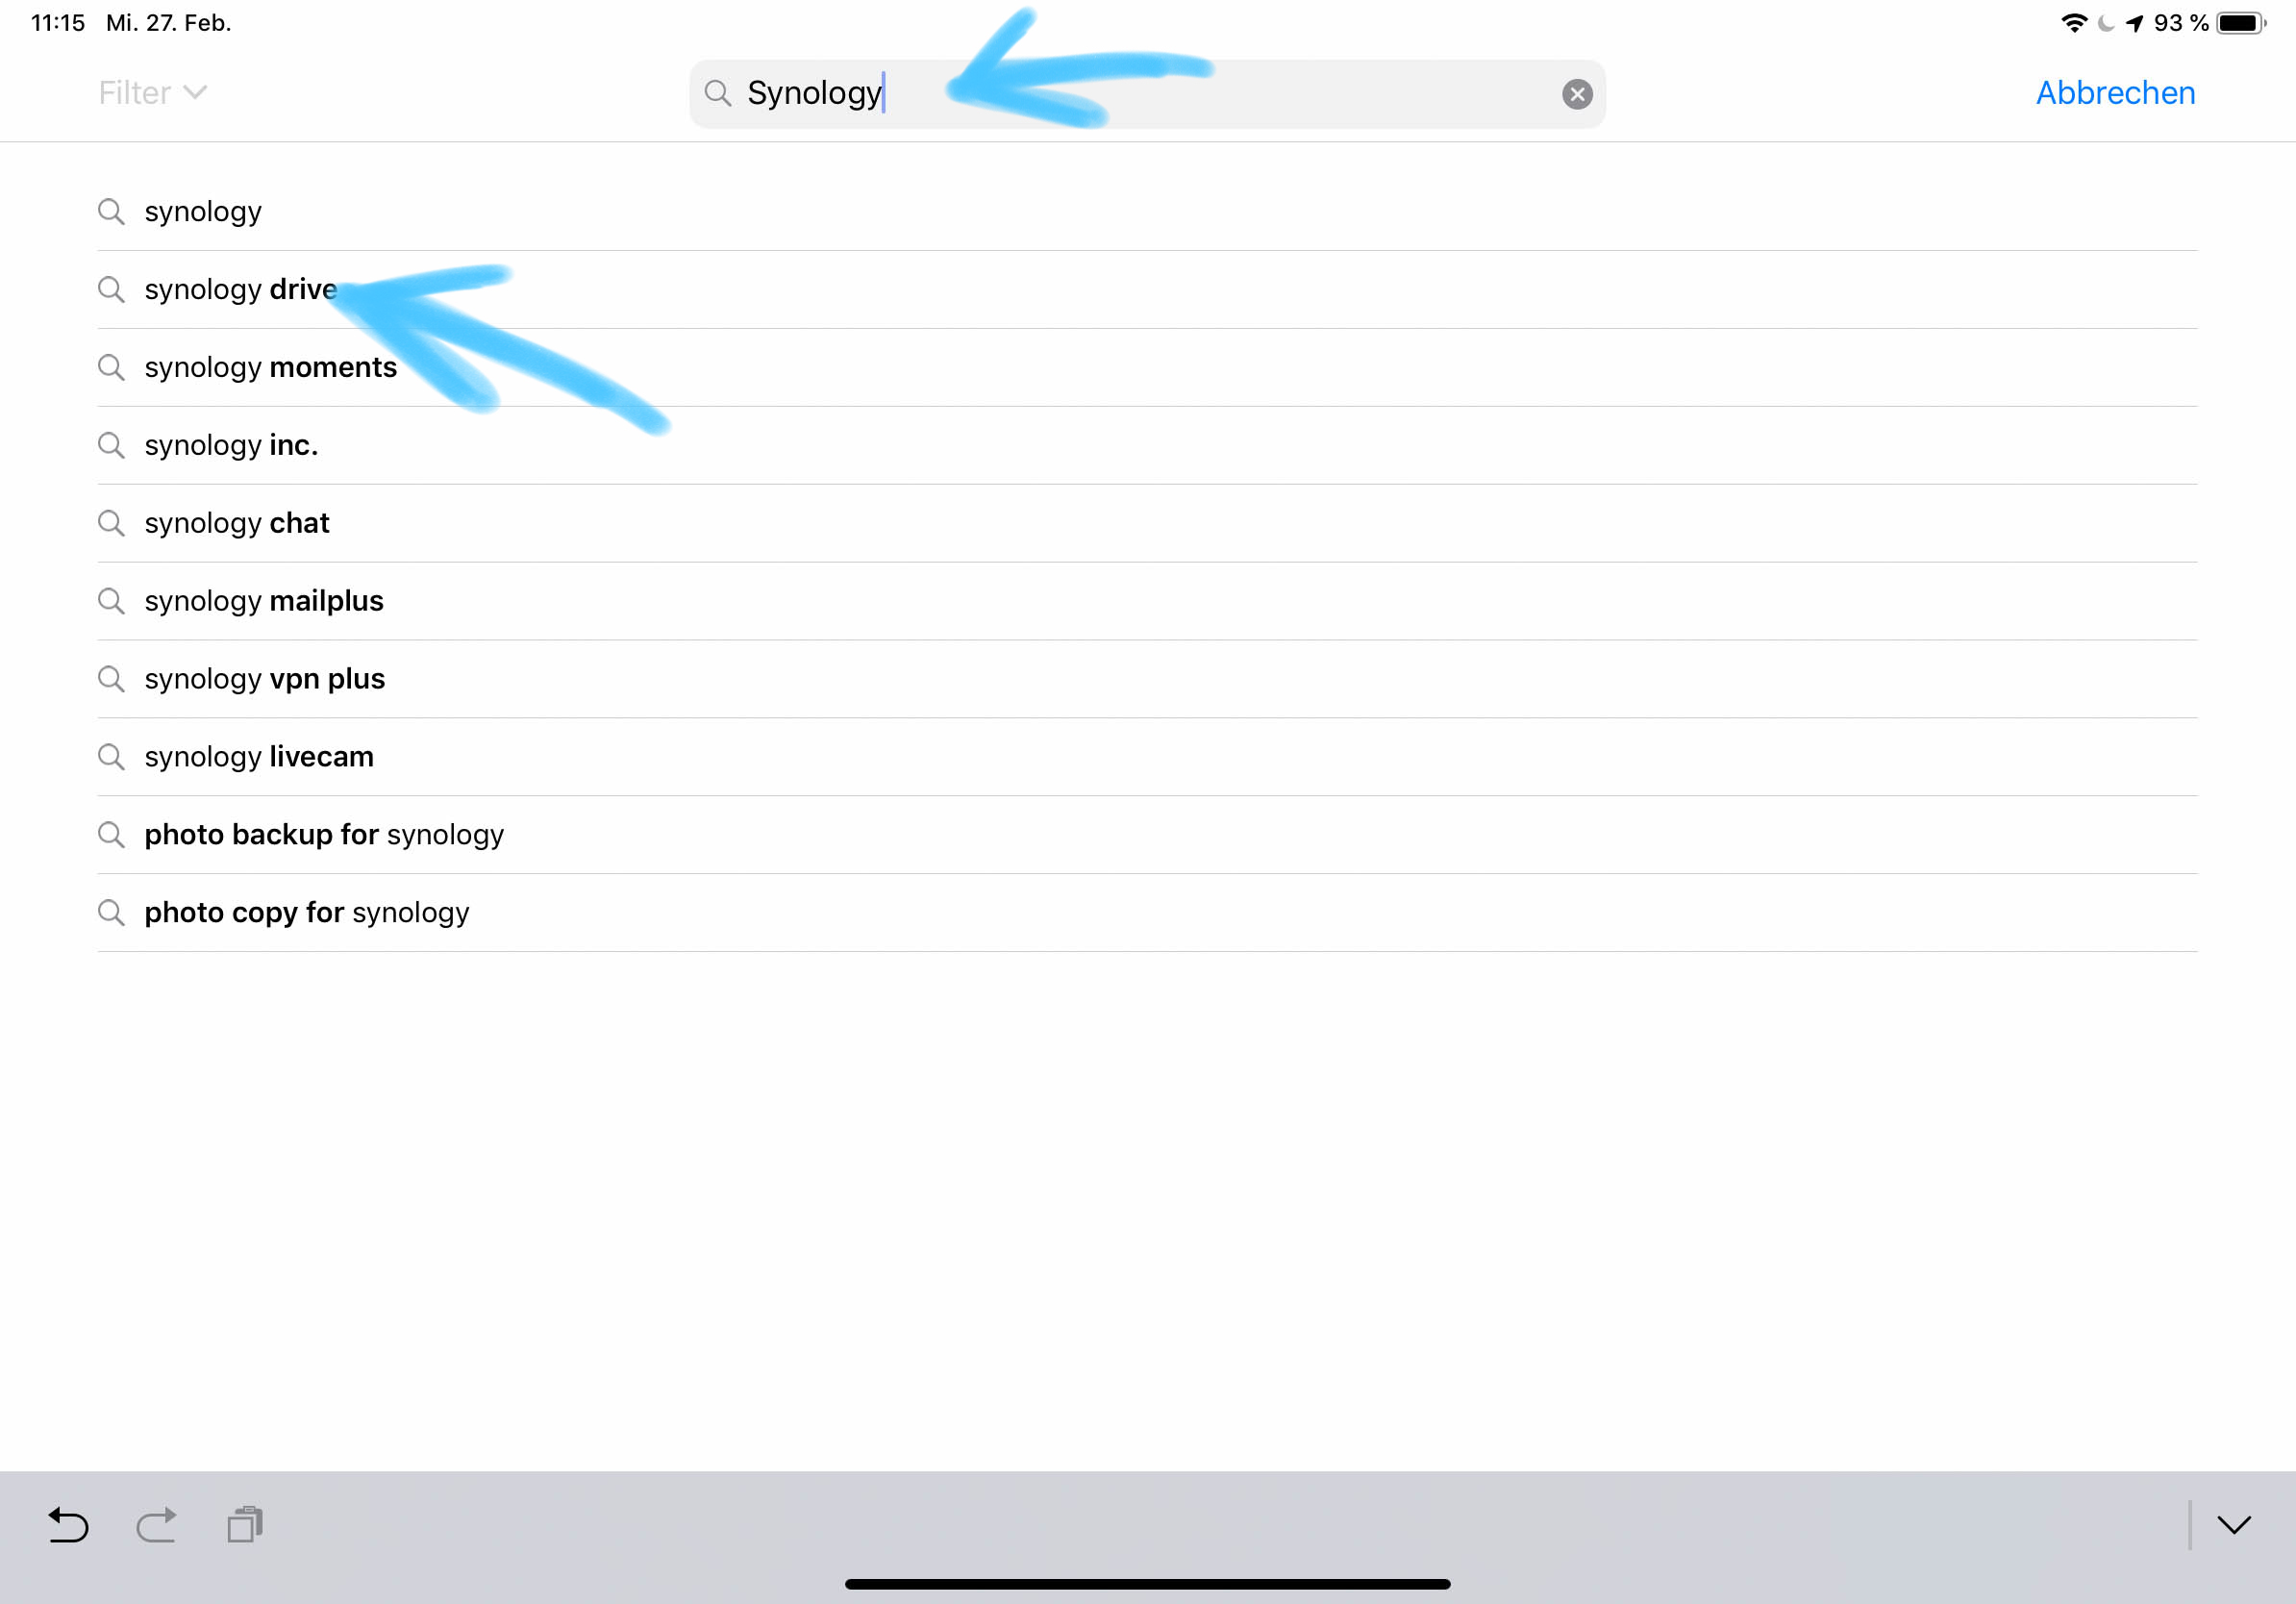
The app's can be installed via the Apple App Store or Google Play Store. After opening the app, just enter the IP address or the QuickID, username and password.

The apps we use

DS FinderThe mobile control systemIt allows us to control and manage the Synology and Notifications from our NAS System.

DS Finder

The mobile control system

It allows us to control and manage the Synology and Notifications from our NAS System.

DS FileOur file ManagerIt’s ideal for managing the files stored on your DiskStation, uploading or downloading between the NAS and any mobile device, or basic editing tasks.

DS File

Our file Manager

It’s ideal for managing the files stored on your DiskStation, uploading or downloading between the NAS and any mobile device, or basic editing tasks.

SynologyDriveIt gives mobile access to our drive folder.

SynologyDrive

It gives mobile access to our drive folder.

Of course there are many more apps in the Apple and Google App Stores. Just have a look in your store and check out the apps you want to work with. You can also get entertainment Apps, like DS Video, DS Photo, Synology Moments and DS Audio.

These apps are easy to install and free to use.

We’ve created a series of blog posts for Synology.

Click through them if you are interested:

  • how to set up and get started guide

  • how to create a shared folder

  • how to setup a new user

  • Synology Drive - working & installation

  • Note Station - the alternative to Evernote and OneNote

  • the apps we use

The Synology Knowledge Base is always a great help. You can directly access the Synology support page via the following link

https://www.synology.com/de-de/support

In collaboration with Synology Deutschland and Honds IT GmbH.

Tags technology, guide

Synology NAS - Note Station "The alternative to Evernote and OneNote"

Marcus Felix Hofschulz March 14, 2019

Synology Note Station is a very good alternative to Evernote or OneNote from Microsoft. The benefit is that your data is in your own Synology NAS and not in a cloud with another provider.

This tool is very easy to install and it also offers the possibility to import data from Evernote. Here is the link to the knowledge base.


Installing on the Synology NAS

1. Click on the Package Center (Paketzentrum)

1. Click on the Package Center (Paketzentrum)

2. Please enter "note Station" into the search field. The application will be displayed immediately. Click on the “install” Botton (Installieren)

2. Please enter "note Station" into the search field. The application will be displayed immediately. Click on the “install” Botton (Installieren)

3. Install the apllication

3. Install the apllication

4. Go to the “main menu” (Hauptmenü) and click on the note station icon

4. Go to the “main menu” (Hauptmenü) and click on the note station icon

5. The application starts immediately and you can start working with it

5. The application starts immediately and you can start working with it

Installing the client on your MAC / PC or mobile device

Now the single devices, like Smartphones, MAC's, PC's etc. you want to work with have to be provided with a client. You can find this client in the App Stores of Android and Apple. The PC software is available on the Synology download page at the following link https://www.synology.com/de-de/support/download

6. Choose your NAS System. In our example it is the DS 1618+ DiskStation

6. Choose your NAS System. In our example it is the DS 1618+ DiskStation

7. Search for the Note Station Client and select your operating system

7. Search for the Note Station Client and select your operating system

8.Click on the client you need and the download window will start automatically. Please click accept (Datei speichern)

8.Click on the client you need and the download window will start automatically. Please click accept (Datei speichern)

9. Click on “continue” (weiter)

9. Click on “continue” (weiter)

10. Please accept the Software License Agreement and click “accept” (Annehmen)

10. Please accept the Software License Agreement and click “accept” (Annehmen)

11. Click “Finish” (Fertigstellen). The Note Station Client is installed and opens automatically

11. Click “Finish” (Fertigstellen). The Note Station Client is installed and opens automatically

12. The login window will be displayed. Please enter the required data. Like IP address or Quick ID. Then enter the username and password. Click on the blue bottom

12. The login window will be displayed. Please enter the required data. Like IP address or Quick ID. Then enter the username and password. Click on the blue bottom

13. The Note Station client is connected to Synology and syconizes the data in both directions

13. The Note Station client is connected to Synology and syconizes the data in both directions

We’ve created a series of blog posts for Synology.

Click through them if you are interested:

  • how to set up and get started guide

  • how to create a shared folder

  • how to setup a new user

  • Synology Drive - working & installation

  • Note Station - the alternative to Evernote and OneNote

  • the apps we use

The Synology Knowledge Base is always a great help. You can directly access the Synology support page via the following link

https://www.synology.com/de-de/support

In the next blog entry we will show you another applications we work with on Synology

In collaboration with Synology Deutschland and Honds IT GmbH.

Tags technology, guide
Synology 4 (1).jpg

Synology NAS - Synology DRIVE "working & installation"

Marcus Felix Hofschulz February 28, 2019

With this blog entry we show you how we work with our Synology Drive.

The NAS offers many ways to simplify your daily professional and personal life in terms of the way you work.

We have been using the Synology Drive tool for years.

It works like a dropbox etc., but your data is in your own cloud.

Synology Drive unites different file portals on Synology NAS and allows a much simplified file management through the cross-platform synchronization of files. Drive also provides seamless sharing capabilities for optimal office collaboration.

In addition, it is very easy and quick to install.

First we start with the Synology Drive installation on the NAS.

1. Click on the “Package Center” (Paketzentrum) button

1. Click on the “Package Center” (Paketzentrum) button

2. click on “all packages” (Alle Pakete). You will get a list of available software.

2. click on “all packages” (Alle Pakete). You will get a list of available software.

3. The “Package Center” (Paketzentum) window opens. Enter "drive" in the search bar. The package "drive" is displayed immediately.Click on install in the "drive" tile. Please follow the steps during the installation.Synology Drive is now installed o…

3. The “Package Center” (Paketzentum) window opens. Enter "drive" in the search bar. The package "drive" is displayed immediately.

Click on install in the "drive" tile. Please follow the steps during the installation.

Synology Drive is now installed on your NAS.

Please note: On our NAS, this application is already installed, so you will see "open" instead of "install" on the application button.

Now the single devices, like Smartphones, MAC's, PC's etc. you want to work with have to be provided with a client. You can find this client in the App Stores of Android and Apple. The PC software is available on the Synology download page at the following link

https://www.synology.com/de-de/support/download

4. Please select your Synology NAS

4. Please select your Synology NAS

5. In our case the Synology DS 1618+ and choose the right client for your device.

5. In our case the Synology DS 1618+ and choose the right client for your device.

In this case we show you how to install Synology Drive on an Apple iPad. The PC or MAC installation is just as easy. For Android users, the Synology Drive is available from the Play Store.

6. Go to the Apple App Store and enter "synology" in the search field. All available Synology products for the iPad will appear immediately. Click on”Synology Drive”.

6. Go to the Apple App Store and enter "synology" in the search field. All available Synology products for the iPad will appear immediately. Click on”Synology Drive”.

8. Install the Synology Drive application.

8. Install the Synology Drive application.

9. The Synology Drive App is installed and click “Open” (Öffnen)

9. The Synology Drive App is installed and click “Open” (Öffnen)

10. The Synology Drive App home screen opens. Please click on continue

10. The Synology Drive App home screen opens. Please click on continue

11. Now you have to enter the IP address of Synology or your Quick ID. Enter the username and password.Click on the next Button

11. Now you have to enter the IP address of Synology or your Quick ID. Enter the username and password.

Click on the next Button

12. Synology Drive is set up and you can work with your Synology Drive folder.

12. Synology Drive is set up and you can work with your Synology Drive folder.

We’ve created a series of blog posts for Synology.

Click through them if you are interested:

  • how to set up and get started guide

  • how to create a shared folder

  • how to setup a new user

  • Synology Drive - working & installation

  • Note Station - the alternative to Evernote and OneNote

  • the apps we use

The Synology Knowledge Base is always a great help. You can directly access the Synology support page via the following link

https://www.synology.com/de-de/support

In the next blog entry we will show you another applications we work with on Synology.

In collaboration with Synology Deutschland and Honds IT GmbH.

Tags technology, guide

Synology NAS - how to setup a "new user"

Marcus Felix Hofschulz February 15, 2019

In this blog entry we focus on the “user setup”. With Synology NAS's flexible user management options, you can create user accounts for individual family members or employees of a company. By creating users, you can set and manage permissions for everyone, such as shared folder access permissions, storage and shared folder quotas, and bandwidth restrictions.

We show you how to easily create and manage a new user in a few steps.

1. Go to your Sysnology NAS main Page and click on the “system control” (Systemsteuerung) icon.

1. Go to your Sysnology NAS main Page and click on the “system control” (Systemsteuerung) icon.

2. Click on the “user” button (Benutzer).

2. Click on the “user” button (Benutzer).

3. Go to the creat buttom and select create “new user” (Neuer Benutzer).

3. Go to the creat buttom and select create “new user” (Neuer Benutzer).

4. Please enter the data of the new user into the appropriate fields.

4. Please enter the data of the new user into the appropriate fields.

5. Our new username is the “test user”. Please check the entered data and click “NEXT” (Weiter) to continue.

5. Our new username is the “test user”. Please check the entered data and click “NEXT” (Weiter) to continue.

6. Here you can choose and click to which group the new user belongs. In this case we have set up the “new user” is a normal user. Click “NEXT” (Weiter).

6. Here you can choose and click to which group the new user belongs. In this case we have set up the “new user” is a normal user. Click “NEXT” (Weiter).

7. Now the permissions of the new user are set. In this case and example he only has read and write permissions on the shared folder "HS-data". Then click on the "NEXT" button (Weiter).

7. Now the permissions of the new user are set. In this case and example he only has read and write permissions on the shared folder "HS-data". Then click on the "NEXT" button (Weiter).

8. Now the user contingent will be defined. Here you can set which storage space size is available for the new user (Neuer Benutzer). If the quota is set to 0, there is no limit. After you finished seting up the storage space, please press the “NEXT…

8. Now the user contingent will be defined. Here you can set which storage space size is available for the new user (Neuer Benutzer). If the quota is set to 0, there is no limit. After you finished seting up the storage space, please press the “NEXT” button (Weiter).

9. Based on the application overview, the “new user” (neuer Benutzer) must be released the applications he needs. This is just a click in the checkbox. In our case, we will share the calendar with the new user. A release for further applications can…

9. Based on the application overview, the “new user” (neuer Benutzer) must be released the applications he needs. This is just a click in the checkbox. In our case, we will share the calendar with the new user. A release for further applications can take place at any time afterwards. Then press the “NEXT” button (Weiter).

10.In this window you can set up the download and upload speed. In our case we have set the maximum speed. if you finished, please press the “NEXT” button (Weiter).

10.In this window you can set up the download and upload speed. In our case we have set the maximum speed. if you finished, please press the “NEXT” button (Weiter).

11. The individual parameters of the “new user” (neuer Benutzer) are now displayed. Please check the data again and move the mouse pointer to the apply button to confirm the settings.

11. The individual parameters of the “new user” (neuer Benutzer) are now displayed. Please check the data again and move the mouse pointer to the apply button to confirm the settings.

12. In the Control Panel/User you can see the created user. Now the user has access to the Synology. In this case he can work now with our calender.

12. In the Control Panel/User you can see the created user. Now the user has access to the Synology. In this case he can work now with our calender.


We’ve created a series of blog posts for Synology.

Click through them if you are interested:

  • how to set up and get started guide

  • how to create a shared folder

  • how to setup a new user

  • Synology Drive - working & installation

  • Note Station - the alternative to Evernote and OneNote

  • the apps we use

The Synology Knowledge Base is always a great help. You can directly access the Synology support page via the following link

https://www.synology.com/de-de/support

In the next blog we will show you which applications we work with on Synology.

In collaboration with Synology Deutschland and Honds IT GmbH.

Tags technology, guide
logging into our Synology at the ocean through a wifi hotspot on our mobilephone

logging into our Synology at the ocean through a wifi hotspot on our mobilephone

Synology NAS - how to create a "shared folder"

Marcus Felix Hofschulz January 30, 2019

After showing you how to set up a Synology NAS in the first blog we're going to create a shared folder in this one. The shared folder is the basis to work with the Synology NAS. Without a shared folder it is not possible to save files and folders.

Data stored in the shared folders can remain private or be shared with specific users or user groups, depending on the customizable access rights. In addition, shared folders can be encrypted during creation to provide an additional layer of protection.

Here is how you create a shared folder step by step:

1. click on the “control panel” (Systemsteuerung)

1. click on the “control panel” (Systemsteuerung)

2. Click on the button “shared folder” (Gemeinsamer Ordner)

2. Click on the button “shared folder” (Gemeinsamer Ordner)

3. Click on the “create” button (Erstellen)

3. Click on the “create” button (Erstellen)

4. Enter the name and description in the displayed fields and press the “next” button. (Weiter)

4. Enter the name and description in the displayed fields and press the “next” button. (Weiter)

5. We are now on the encryption side. It's up to you to encrypt the data. Click on the “next” button. (Weiter)

5. We are now on the encryption side. It's up to you to encrypt the data. Click on the “next” button. (Weiter)

6. On this page you will find the advanced settings. Here you can e.g. define the data quota. Please click on the “next” button (Weiter)

6. On this page you will find the advanced settings. Here you can e.g. define the data quota. Please click on the “next” button (Weiter)

7. Now the settings have to be confirmed. Press the “confirm” button. (Übernehmen)

7. Now the settings have to be confirmed. Press the “confirm” button. (Übernehmen)

8. Here you can assign the access rights for this folder. After you have chosen the access rights, please press the ”OK” button.

8. Here you can assign the access rights for this folder. After you have chosen the access rights, please press the ”OK” button.

9. After you've confirmed everything, the shared folder can be used. The created “shared folder” is now displayed in the system control panel (Systemsteuerung)

9. After you've confirmed everything, the shared folder can be used. The created “shared folder” is now displayed in the system control panel (Systemsteuerung)

Congratulations, youve created yourself a shared folder! Now you can start working with you NAS.


We’ve created a series of blog posts for Synology.

Click through them if you are interested:

  • how to set up and get started guide

  • how to create a shared folder

  • how to setup a new user

  • Synology Drive - working & installation

  • Note Station - the alternative to Evernote and OneNote

  • the apps we use

The Synology Knowledge Base is always a great help. You can directly access the Synology support page via the following link

https://www.synology.com/de-de/support

In the next blog entry we will show you how to create a user on your system.

In collaboration with Synology Deutschland and Honds IT GmbH.

Tags technology, guide
Older →
 
  • 2020
    • Jan 4, 2020 1 Month Switzerland Jan 4, 2020
  • 2019
    • Nov 21, 2019 Coast of Denmark Nov 21, 2019
    • Oct 1, 2019 français memories Oct 1, 2019
    • Aug 30, 2019 Roadtrip Italy Aug 30, 2019
    • Jul 31, 2019 Palermo Jul 31, 2019
    • Jul 15, 2019 Sicily Jul 15, 2019
    • May 22, 2019 Our Offroad Car May 22, 2019
    • May 15, 2019 Lisbon & Barber May 15, 2019
    • Apr 23, 2019 Our first Van Apr 23, 2019
    • Apr 4, 2019 Portugal back in January Apr 4, 2019
    • Mar 31, 2019 this week in Paris Mar 31, 2019
    • Mar 24, 2019 Roadtrip Morocco - Part 2 Mar 24, 2019
    • Mar 21, 2019 Synology NAS - the apps we use Mar 21, 2019
    • Mar 14, 2019 Synology NAS - Note Station "The alternative to Evernote and OneNote" Mar 14, 2019
    • Mar 5, 2019 Chefchaouen Mar 5, 2019
    • Feb 28, 2019 Synology NAS - Synology DRIVE "working & installation" Feb 28, 2019
    • Feb 15, 2019 Synology NAS - how to setup a "new user" Feb 15, 2019
    • Feb 13, 2019 Roadtrip Morocco - Part 1 Feb 13, 2019
    • Jan 30, 2019 Synology NAS - how to create a "shared folder" Jan 30, 2019
  • 2018
    • Dec 21, 2018 Winter favorites Dec 21, 2018
    • Nov 28, 2018 Our first propper Drone Nov 28, 2018
    • Nov 20, 2018 Paris Nov 20, 2018
    • Nov 6, 2018 Synology NAS - how to set up and get started guide Nov 6, 2018
    • Oct 29, 2018 Cologne III Oct 29, 2018
    • Sep 9, 2018 People we've met Sep 9, 2018
    • Aug 29, 2018 Kaprun high mountain reservoirs / Zell am See Aug 29, 2018
    • Aug 21, 2018 Grossglockner High Alpine Road Aug 21, 2018
    • Aug 13, 2018 Plansee and the mountains around Aug 13, 2018
    • Aug 8, 2018 Hiking Taubensee between Germany & Austria Aug 8, 2018
    • Jul 19, 2018 Cologne II Jul 19, 2018
    • Jul 1, 2018 Hiking Hochstaufen in Chiemgau Bavaria Jul 1, 2018
    • May 30, 2018 Kehlstein May 30, 2018
    • May 16, 2018 Things to do in Lahti region Finland May 16, 2018
    • Apr 25, 2018 Cologne Apr 25, 2018
    • Apr 18, 2018 Eibsee & Zugspitze Apr 18, 2018
    • Apr 11, 2018 unplanned mornings... Apr 11, 2018
    • Apr 4, 2018 Photographers for Charity Apr 4, 2018
    • Mar 27, 2018 empty Königsee Mar 27, 2018
    • Mar 20, 2018 Hintersee Mar 20, 2018
    • Mar 14, 2018 between white and white Mar 14, 2018
    • Mar 7, 2018 Switching from Mac to Microsoft Mar 7, 2018
    • Feb 28, 2018 afternoon in the mountains Feb 28, 2018
    • Feb 21, 2018 Gloomy evening Feb 21, 2018
    • Feb 14, 2018 Norway, an experience for all senses Feb 14, 2018
    • Feb 7, 2018 Peak Performance x Vienna Feb 7, 2018
    • Feb 1, 2018 Hoy, Züri! Feb 1, 2018
    • Jan 24, 2018 Roadtripping through Winter Wonderland Switzerland Jan 24, 2018
  • 2017
    • Dec 13, 2017 Trip to Mont Blanc Dec 13, 2017
    • Nov 7, 2017 On the road with Adobe Creative Cloud Nov 7, 2017
    • Nov 1, 2017 Early mornings... Nov 1, 2017
    • Oct 20, 2017 Tokyo Oct 20, 2017
    • Sep 28, 2017 3 days Tokyo Sep 28, 2017
    • Sep 25, 2017 Tokyo x Sony Sep 25, 2017
    • Sep 9, 2017 late summer rain swim Sep 9, 2017
    • Mar 31, 2017 GEO - Instagrammer der Woche | #13/17: @into_theworld Mar 31, 2017
  • 2016
    • Dec 5, 2016 into the world - “Best Intagram Travel account of 2016” - Dec 5, 2016
  • 2015
    • May 27, 2015 Oh! It’s Gaga’s Mom May 27, 2015
    • May 27, 2015 People & People III May 27, 2015
    • May 3, 2015 Jadranska Magistrala May 3, 2015
    • Apr 15, 2015 Valleys – Hills – Sea Apr 15, 2015
    • Apr 13, 2015 Better than pizza Apr 13, 2015
    • Apr 13, 2015 People & People I Apr 13, 2015
    • Apr 13, 2015 People & People II Apr 13, 2015
    • Apr 12, 2015 Short stopover Apr 12, 2015
    • Mar 31, 2015 White Valencia Mar 31, 2015
    • Mar 30, 2015 Black Madrid Mar 30, 2015
    • Mar 22, 2015 uno…dos…tres… Mar 22, 2015
    • Mar 17, 2015 Gibraltar Mar 17, 2015
    • Mar 14, 2015 On the way to Algarve… Mar 14, 2015
    • Feb 27, 2015 Lisbon Feb 27, 2015
    • Feb 19, 2015 Cascais Feb 19, 2015
    • Feb 11, 2015 Wild bus rides and wonderful people Feb 11, 2015
    • Feb 9, 2015 2355 km… Feb 9, 2015
    • Jan 20, 2015 Abfahrt Jan 20, 2015
  • 2014
    • Nov 30, 2014 Ich packe meinen Koffer… Nov 30, 2014
    • Jul 27, 2014 Aufbruchgefühle Jul 27, 2014
    • Jul 16, 2014 The Beginning Jul 16, 2014

© Hofschulz & Schoppa 2024